Good Eats: Stuffed Pepper Casserole

Growing up, I was not what you would call a “picky eater.” I loved to eat, and there were very few things I would turn down.

One of my favorite meals my mom would make was stuffed peppers. My brother and sister would eat the cheesy rice stuffing and forgo the pepper, but I loved it all! We didn’t eat them all that often, but I distinctly remember large peppers overflowing with rice, hamburger, tomato sauce and cheese.

So. Good!

As I’m making strides in eating healthier, I knew this would be a recipe I could easily adapt, simply swap out a few items. And it sounded delicious! Of course, HOS wouldn’t eat a stuffed pepper if I paid him, and Charli is a bit young for this dish. The best way to please my baby and fulfill my craving was to create a healthy, stuffed pepper casserole.

I can’t say whether or not Charlotte enjoyed the dish. It was one of her rebellious evenings when she chose to eat presumably large quantities of animal cookies at daycare just before I arrived. She didn’t eat dinner at all. But I loved it!

If you like stuff peppers, you’re sure to enjoy this rendition.

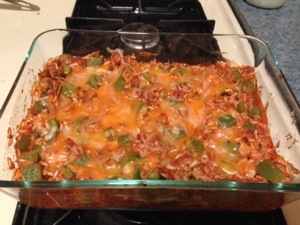
Clean Stuffed Pepper Casserole

20140113-215012.jpg

Ingredients
1 lb ground turkey
2-3 large green peppers
1 cup brown rice
(1) 12 oz can organic tomato sauce
Mrs. Dash onion and herb seasoning
1-2 cups mozzarella
2.5 cups water

Recipe
1. Boil 1 cup brown rice in 2.5 cups water until tender. Water will all be evaporated or absorbed by the rice. Preheat oven to 350 degrees.

2. While the rice is boiling, brown the ground turkey on a low temp. I seasoned the meat as it was cooking, adding 1 tsp (ish) Mrs. Dash when it is first place in the skillet and again after the meat is turned the first time.

3. Chop the green peppers and add to the turkey as it is browning. This will result in softer peppers. For a crunchier pepper, wait to add them until after the brown rice is ready.

4. When the rice is finished boiling, stir into the skillet.

5. Pour the tomato sauce into the skillet and let cook on low for a few minutes, stirring.

6. Pour the contents of the skillet into a casserole dish. If using 2 cups of cheese, cut in 1 cup of mozzarella into the casserole. If only using 1 cup, cheese will be added later.

7. Bake at 350 degrees for 15 minutes.

8. Remove the casserole and top with the remaining mozzarella. Return to oven for 3 minutes.

9. Enjoy!

In the future, I would like to try this recipe with some stewed or diced tomatoes. I’ll probably reduce the sauce quantity if I add tomatoes.

What’s your favorite stuffed pepper recipe?

Good Eats: Lazy Chicken Pot Pie

One of the hardest things I do as a grown-up is budget. And I don’t do it well!

As it turns out, I like to spend A LOT of money on food. What can I say? I like to eat!

I didn’t want my love of food to suffer just so I could save a few bucks, so I decided to try a new approach. For the first time in my life, I created a meal plan. … And I’m sticking to it!

At the beginning of each pay period, I sit down and select a menu for the whole pay period. I make a list of what food I need, check the ads and then head to the store. So far, I’m cutting my grocery bill in half. It doesn’t like much, but it’s going a long way!

But that’s not what I meant to write about!

I’m taking this new meal plan as an opportunity to try new recipes. Now that the weather has taken an unpleasant dive toward winter temperatures, I developed a craving for chicken pot pie. Only one problem, I have no idea how to make a pie crust.

Oh, and I’m lazy.

Maybe not so much lazy as short on time…

So! I did some Googling and threw together my lazy chicken pot pie recipe.

Chicken Pot Pie

20131113-211030.jpg

Ingredients
2-3 large chicken breasts
1 can of Veg-All mixed vegetables
1 10 3/4 oz can of cream of chicken soup
2 Pillsbury pie crust (I used the refrigerated pie crusts.)

Recipe
1. Place the frozen chicken in a crock pot with 1.5 – 2 cups of water. Cook on low for 6-8 hours.

2. Preheat oven to 450 degrees. Place one of the pie crusts in the pie pan and bake 10 minutes.

3. While the pie crust is baking, shred the cooked chicken and mix with the drained vegetables and cream of chicken soup. Add pepper to taste.

4. After the 10 minutes of baking, remove the pie crust from the oven. Pour the filling mix into the crust and place the second crust on top. Cut holes into the pie crust with a butter knife.

5. Return the pie to the oven and bake for 25 minutes or until the crust is golden brown.

6. Remove the pie and let it cool a few minutes before serving.

I don’t remember eating a lot of chicken pot pies growing up, so I don’t have a strong base line for comparison. … But I’ll definitely be making this again!

What’s your favorite chicken pot pie recipe?

Good Eats: Lemon Blueberry Muffins and Double Chocolate Muffins

For the past two glorious hours, I have been elbow deep in flour, sugar and the wonderful world of baking.

My kitchen is a disaster.

My sink is filled with dishes.

My clothes are covered in ingredients.

And I couldn’t be happier.

I decided that this would be the night I would finally test out my mini muffin pans and the silicone liners. Ok, I realize that silicone muffin liners sounds silly, especially when you find out I spent more than $9 per dozen, BUT these are, hands down, the best baking purchase if you like to bake muffins! They are non-stick, reusable, and the muffins pop right out. Perfect!

Back to the really good stuff, the actual muffins.

I perused Pinterest for a while this morning until I found three recipes I wanted to try. Due to a combination of time, exhaustion and sheer laziness, I only made two of the three, Lemon Blueberry and Double Chocolate. Who could go wrong?

[Just a side note: Yes, Santa Claus makes an appearance in the background of my images. While I enjoy baking and sharing, I am lacking in the large Tupperware department. This is all I had.] 

Lemon Blueberry Muffins [mini]

Lemon Blueberry Muffin

Ingredients
1/3 cup milk
1/3 cup vegetable oil
1 egg
1/2 tsp lemon extract
11/2 cup flour
3/4 cup sugar
1/2 tsp salt
2 tsp baking powder
1/4 tsp nutmeg
1/2 cup sour cream
1 cup blueberries
1/2 cup powdered sugar
1/2 lemon juice
1 TB lemon rind (To be honest, I wasn’t 100 percent sure on what this was, so I left it out.)

Recipe

  1. In a large bowl whisk together milk, vegetable oil, egg, lemon extract and lemon rind. In a separate bowl combine flour, sugar, salt, baking powder and nutmeg. Mix the dry ingredients into the large bowl and stir until smooth. Fold in sour cream and blueberries. I had to chop my blue berries because they were big enough to fill half of one mini muffin cup.
  2. Preheat oven to 375. Fill cupcake pan with liners (or use a cooking spray) and fill with batter about 2/3 the way full. Bake for 20-25 minutes or until lightly browned. Remove muffins from pan and allow to cool.
  3. If you were doing this correctly, you would combine powdered sugar and lemon juice in a small bowl and drizzle over muffins. If you’re moving too quickly, like me, and don’t read the full instructions, you just squeeze a few drops of lemon juice onto the muffins. *sigh* At least they taste good!

Double Chocolate Muffins [mini]

Image

Ingredients
1 1/2 c all-purpose flour
1/2 Tbsp baking powder
1/4 tsp baking soda
1/4 tsp salt
5 Tbsp unsalted butter, room temperature
3/4 c granulated sugar
1 large egg
1/2 tsp vanilla extract
3/4 c yogurt
1/2 c semi-sweet chocolate chips
1/4 c chopped milk chocolate (one whole Hershey’s milk chocolate bar)

Recipe

  1. Preheat oven to 400 degrees. Line muffin tin. Set aside.
  2. In a medium mixing bowl, whisk together flour, baking powder, soda and salt. Stir.
  3. In a separate bowl, cream butter and sugar until fluffy.
  4. Add egg, vanilla and yogurt. Mix well.
  5. Combine the dry ingredients to the egg mixture a little at a time. Mix well.
  6. Add chocolate chips and chopped chocolate and stir it in.
  7. Drop the batter in to the liners using a small cookie scoop.
  8. Bake for 5 minutes in 400 degree oven. Reduce the temperature to 375 degrees and bake 14 more minutes, or until browned on top.

I always recommend taste-testing 1-4 mini muffins before sharing with friends or family. I mean, they are mini.

Good Eats: Garlic Bread Pizza

I may be lacking in the hobby department lately, but there is one thing that I’m never far from – good eats!

I love me some food. And I’m anything but picky, so it’s easy for me to find new recipes to enjoy. Pinterest has just taken my love of food to a new level.

One of the first recipes I pinned was for a pizza dip from Closet Cooking. My friends and I had a dip party last year, and the pizza dip was a hit. But what can be even better than pizza dip?

Pizza!

I took the recipe from Closet Kitchen – sans peppers and olives – and put it on garlic bread instead of in a pie pan. I made this version of a garlic bread pizza again tonight and thought it would be a good recipe to share.

If you like cream cheese, you’ll love this recipe!

Garlic Bread Pizza

Ingredientsgarlic bread pizza ingredients
4 oz cream cheese (softened)
1/4 cup sour cream
1/4 cup grated parmesan
1 – 1.5 cups shredded mozzarella
8 oz pizza sauce
1 small package pepperonis
1 loaf frozen garlic bread

Recipe
1. Mix the cream cheese, sour cream, parmesan, and 1/2 cup of the mozzarella in a bowl. Smother mixture on the open faces of the garlic bread.

2. Spread the pizza sauce on top of the mixture. I’m not huge on red sauces, so I don’t use the full 8 oz.

3. Place the pepperonis on top of the sauce. Add as few or as many as you’d like.

4. Sprinkle the remaining mozzarella on top of the pepperonis. I like lots of cheese, so I used 1 cup, but you can use as much or as little as you would like.

5. Follow the directions on the garlic bread package. I used Pepperidge Farms garlic bread and baked the pizza at 350 degrees for 10 minutes. Baking time will depend on whether you like softer or crispier bread.

6. My favorite step… Enjoy!

garlic bread pizza